Thursday, July 23, 2009

EC2 Instance Belonging to Multiple ELBs

I discovered an interesting feature of Amazon EC2 Elastic Load Balancing today: you can add an EC2 instance to more than one ELB virtual appliance. Below I demonstrate the steps I took to set up two ELBs each containing the same instance, and afterward I explain how this technique can be used to deliver different classes of service.

How to Set Up One Instance Belonging to Multiple ELBs

I set this up using the standard EC2 API and EC2 ELB command-line tools. First I launched an instance. I used my favorite Alestic image, the Ubuntu 8.04 Hardy Server AMI:
My default security group allows access to port 80, but if yours doesn't you will need to either change it (for this experiment) or use a security group that does allow port 80. Once my instance was running I sshed in (you should use your own instance's public DNS name here):
In the ssh session, I installed the Apache 2 web server:
Then I tested it out from my local machine:
The result, showing the HTML It works! means Apache is accessible on the instance.

Next, to set up two load balancers. On my local machine I did this:

Output:
DNS-NAME lbOne-1123463794.us-east-1.elb.amazonaws.com


Output:
DNS-NAME lbTwo-108037856.us-east-1.elb.amazonaws.com
Once the load balancers were created, I added the instance to both as follows:

Output:
INSTANCE-ID i-0fdcda66


Output:
INSTANCE-ID i-0fdcda66
Okay, EC2 accepted that API call. Next, I tested that it actually works, directing HTTP traffic from both ELBs to that one instance:


Both commands produce It works!, the same as when we accessed the instance directly. This shows that multiple ELBs can direct traffic to a single instance.

What Can This Be Used For?

Here are some of the things you might consider doing with this technique.

Creating different tiers of service

Using two different ELBs that both contain (some of) the the same instance(s) can be useful to create different classes of service without using dedicated instances for the lower service class. For example, you might offer a "best-effort" service with no SLA to non-paying customers, and offer an SLA with performance guarantees to paying customers. Here are example requirements:
  • Paid requests must be serviced within a certain minimum time.
  • Non-paid requests must not require dedicated instances.
  • Non-paid requests must not utilize more than a certain number (n) of available instances.
To build a system that fulfills these requirements you can set up two ELBs, one for each class of service (and direct traffic appropriately). The paying-tier ELB contains n instances at first, and the free-tier ELB contains those very same n instances. You can then set up Auto Scaling for the paying-tier ELB, allowing it to scale based on average CPU or average latency across the paying-tier ELB. This would allow the paying-tier service to scale up and down with demand, but always leaving the original n instances in the paying-tier ELB pool, and always limiting the free-tier to using those n instances. And, all this is done without requiring separate instances for the free-tier ELB.

("Huh?" you say. "Won't Auto Scaling terminate the original n instances that were in the paying-tier ELB pool?" No. Auto Scaling does not consider instances that were already in an ELB when the Auto Scaling group was created. As soon as I find this documented I'll add the source here. In the meantime, trust me, it's true.)

Splitting traffic across multiple destination ports

The ELB forwarding specification is called a listener. A listener is the combination of source-port, protocol type (HTTP or TCP), and the destination port: it describes what is forwarded and to where. In the above demonstration I created two ELBs that both have the same listener, forwarding HTTP/80 to port 80 on the instance. But the ELBs can also be configured to forward HTTP/80 traffic to different destination ports. Or, the the ELBs can be configured to forward traffic from different source ports to the same destination port. Or from different source ports to different destination ports. Here's a diagram depicting the various possible combinations of listeners:
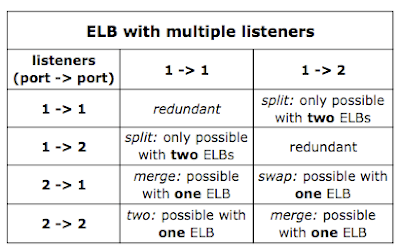
Different combinations of ELB listeners that might make sense together

As the table above shows, there are only a few combinations of listeners. Two listeners that are the same (1 -> 1, 1 -> 1 and 1-> 2, 1 -> 2) are redundant (more on this below), possibly only making sense as explained above to provide different classes of service using the same instances. Two listeners forwarding the same source port to different destination ports (1 -> 1, 1 -> 2) can only be achieved with two ELBs. Two listeners that "merge" different source ports into the same destination port (1 -> 1, 2 -> 1 and 1 -> 2, 2 -> 2) can be done with a single ELB. So can two listeners that "swap" source ports and destination ports between them (1 -> 2, 2 -> 1). So can two listeners that map different source ports to different destination ports (1 -> 1, 2 -> 2).

Did you notice it? I said "can be done with a single ELB". Did you know you can have multiple listeners on a single ELB? It's true. If we wanted to forward a number of different source ports all to the same destination port we could accomplish that without creating multiple ELBs. Instead we could create an ELB with multiple listeners. Likewise, if we wanted to forward different source ports to different destination ports we could do that with multiple listeners on a single ELB - for example, using the same ELB with two listeners to handle HTTP/80 and TCP/443 (HTTPS). Likewise, swapping source and target ports with two listeners can be done with a single ELB. What you can't do with a single ELB is split traffic from a single source port to multiple destination ports. Try it - the EC2 API will reject an attempt to build a load balancer with multiple listeners sharing the same source port:

Output:
elb-create-lb: Malformed input-Malformed service URL: Reason:
elasticloadbalancing.amazonaws.com - https://elasticloadbalancing.amazonaws.com
Usage:
elb-create-lb
LoadBalancerName --availability-zones value[,value...] --listener
"protocol=value, lb-port=value, instance-port=value" [ --listener
"protocol=value, lb-port=value, instance-port=value" ...]
[General Options]
For more information and a full list of options, run "elb-create-lb --help"
Granted, the error message misidentifies the problem, but it will not work.

Where does that leave us? The only potentially useful case for using two separate ELBs for multiple ports, with the same instance(s) behind the scenes, is where you want to split traffic from a single source port across different destination ports on the instance(s). Practically speaking, this might make sense as part of implementing different classes of service using the same instances. In any case, it would require differentiating the traffic by address (to direct it to the appropriate ELB), so the fact that the actual destination is on a different port is only mildly interesting.

Redundancy - Not.

Putting the same instance behind multiple load balancers is a technique used with hardware load balancers to provide redundancy: in case one load balancer fails, the other is already in place and able to take over. However, EC2 Elastic Load Balancers are not dedicated hardware, and they may not fail independently of each other. I say "may not" because there is not much public information about how ELB is implemented, so nobody who is willing to talk knows how independent ELBs are of each other. Nevertheless, there seems to be no clear redundancy benefits from placing one EC2 instance into multiple ELBs.

With Auto Scaling - Maybe, but why?

This technique might be able to circumvent a limitation inherent in Auto Scaling groups: an instance may only belong to a single Auto Scaling group at a time. Because Auto Scaling groups can manage ELBs, you could theoretically add the same instance to both ELBs, and then create two Auto Scaling groups, one managing each ELB. Your instance will be in two Auto Scaling groups.

Unfortunately you gain nothing from this: as mentioned above, Auto Scaling groups ignore instances that already existed in an ELB when the Auto Scaling group was created. So, it appears pointless to use this technique to circumvent the Auto Scaling limitation.

[The Auto Scaling limitation makes sense: if an instance is in more than one Auto Scaling group, a scaling activity in one group could decide to terminate that shared instance. This would cause the other Auto Scaling group to launch a new instance immediately to replace the shared instance that was terminated. This "churn" is prevented by forbidding an instance from being in more than one Auto Scaling group.]

In short, the interesting feature of ELB allowing an instance to belong to more than one ELB at once has limited practical applicability, useful to implement different service classes using the same instances. If you encounter any other useful scenarios for this technique, please share them.
Wednesday, July 22, 2009

The EC2 Instance Life Cycle

Working with virtual infrastructure is not a whole lot different than using real hardware, but it's easy to get confused when things are different. In this article I'll take a look at the life cycle of Amazon EC2 instances and how it differs from the traditional life cycle of real computers.

Update January 2010: This article has been updated to incorporate new options introduced by the Boot-from-EBS feature.

The Life Cycle of "Real" Computers

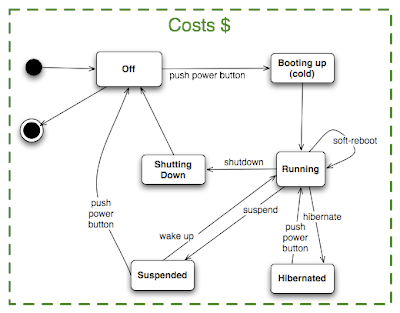
By "life cycle" I mean "the different stages that a computer goes through from power-on to power-off". This is best explained with a diagram:

Real computers begin their service lives "off". Someone hits the power button and the computers start booting up, eventually settling into a "running" state. From there they can be rebooted, hibernated, suspended, or shut-down normally. (Of course, something abnormal can happen, such as a power failure, which would cause the machine to immediately return to the "off" state. This is not represented in the diagram above.)

The diagram highlights two important features of the life cycle of real computers:
  1. Real computers cost you money even when they are not in use. Of course they consume power when they are on, and you pay for that power. But even when they are off they cost money, if only for the space that they occupy. This is represented in the diagram by the green box: real computers cost you money no matter if they are in use or not.
  2. Even when they are "off", real computers remain yours. The information stored on their hard drives stays there, waiting to be accessed the next time the machine is powered on. This is represented by the arrows leading into and exiting the "off" state: even if you turn a computer off, you can still turn it on again.

The Life Cycle of EC2 Instances

The above two features of real computers, costing money and being yours to control, are different for virtual computers in the cloud. Different clouds have different features, and in Amazon EC2 there are two different ways of booting up an instance. Depending on which boot method you use you get different life cycle models. You can boot from an S3-backed AMI (also called an instance store AMI), or from an EBS-backed AMI. (The pros and cons of each kind of AMI are beyond the scope of this article.)

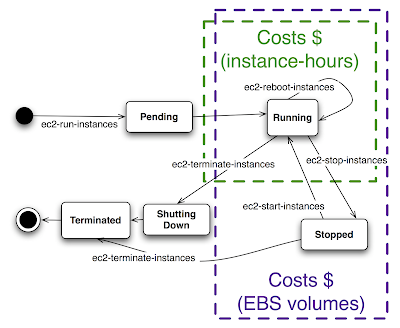
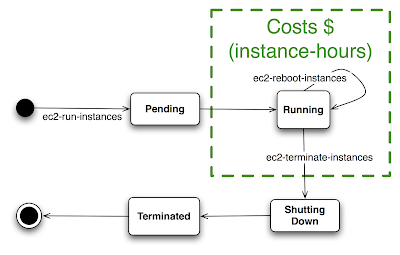
When you boot from an S3-backed AMI the instance life cycle looks like this:

S3-backed AMI instances begin their lives when you launch them (such as with the ec2-run-instances command). They spend some time in the "pending" state, waiting for the reservation to be fulfilled. Once the instances have begun to boot they are in the "running" state. Here they will stay until they are terminated (such as with the ec2-terminate-instances command), which causes the instances to begin "shutting down", ending with the instances being "terminated".

EBS-backed AMIs have a life cycle more similar to that of real computers:

EBS-backed AMI instances begin their lives when launched, spending some time in the "pending" state until the order is fulfilled. When the instances start booting they are "running". From there they can be rebooted or shut down, like S3-backed AMI instances. They can also be "stopped" (such as with the ec2-stop-instances command), from which they can be started again (e.g. with the ec2-start-instances command) or terminated.

The above diagrams illustrate how EC2 instances are different than real computers as far as costing money and being yours to control is concerned:
  1. EC2 instances only cost money when they are "running". You do not pay for instance-hours for pending, stopped, shutting down, or terminated instances. This is represented in the diagrams by the green box, which only surrounds the "running" state. This is unlike real computers, which cost money even when they are hibernating or powered off. EC2 instances that are "stopped" are not charged for any instance-hours, but the attached EBS volumes still do cost money. This is represented by the purple box, which surrounds both the "running" and "stopped" states. Note that, by default, EBS-backed AMI instances delete the associated EBS boot volume when they are terminated, so the cost of the EBS boot volume is not incurred once the instance terminates. This behavior can be changed at launch time, leaving the associated EBS volume intact even after the instance terminates. This situation is not illustrated, but in this case the EBS volume costs money until it is deleted.
  2. You control instances that are "running" and "stopped" - you can attach and detach EBS volumes from them (but you can't detach the boot volume from an EBS-backed AMI instance that is "running"). But, once an EC2 instance has begun "shutting down", you no longer control it. In the diagrams above there is no way to get an instance from "shutting down" back to "running". This means that you cannot get back an instance that was terminated - the data stored on that computer's local disks ("ephemeral storage") can not be retrieved. Real computers, on the other hand, are still controlled by you when they are not running - all you need to do to access their data is to power them on.

Follow-on Questions

If the data that you place on the "ephemeral storage" of an EC2 instance is no longer accessible once you terminate it, what happens to the data? Specifically:
  • What processes does Amazon have in place to make sure that the ephemeral storage drives do not present a privacy risk, allowing other instances possibly belonging to other people to see the data left over on the ephemeral drives you have relinquished?
  • What can you do to mitigate the privacy risk of your leftover data on ephemeral storage, without relying on Amazon to do it for you?
If you can't restart a terminated instance and you can't access the data on a terminated instance, how do you accomplish in the EC2 cloud all the "usual" things that you do with real computers? Specifically:
  • How do you keep data and applications in EC2 without keeping an instance running? (Hint: use EBS-backed AMIs and "stop" & "start" the instances as needed.)
  • How do you make sure that your data and applications can be easily restored if your instance terminates unexpectedly?
And, what does an AMI have to do with the life cycle model? What about the life cycle model changes if you bundle your instance into an AMI? (Spoiler: nothing).

These questions will be the subject of future articles, so stay tuned.

Wednesday, July 15, 2009

Copying ElasticFox Tags from One Browser to Another

The ElasticFox Firefox extension allows you to tag EC2 instances, EBS volumes, EBS snapshots, Elastic IPs, and AMIs. ElasticFox's tags are stored locally within Firefox, so if you use ElasticFox from more than one browser your tags from one browser are not visible in any other browser. In this article I demonstrate how to copy tags from one ElasticFox installation to another.

Where Are ElasticFox Tags Stored?

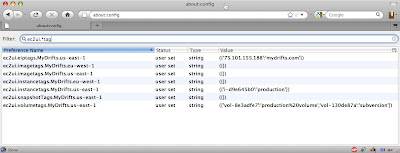
My article about Tagging EC2 Instances Using Security Groups shows a brief walkthrough of using ElasticFox to tag instances. Under the hood, ElasticFox stores tags in the prefs.js file within your Firefox Profile directory. But instead of poking around in there directly, take a look at Firefox's built-in interface to these preferences. It's the about:config screen, and you get there by typing about:config into the address bar:

The Firefox about:config screen

Click "I'll be careful, I promise!" Up comes the about:config screen, with all sorts of interesting-looking settings. We're interested in the ElasticFox tags only, so type ec2ui.*tag in the Filter field, and the result looks like this:

Viola! The ElasticFox tags are stored here.

Viola! Those are the ElasticFox tags that I've set up.

Copying ElasticFox Tags to Another Browser Manually

You can copy ElasticFox tags from the about:config screen, via the clipboard, into a text file. First, open the about:config screen and use the Filter as described above to see the relevant settings. Create an empty text file and copy each setting (right-click on the entry and choose "Copy") and paste it into the text file. Add each setting you want to transfer into the text file. You can email the text file to yourself (or put it on your USB key) and then use the text file to help you change the values of these settings in the target browser's about:config screen.

One copied setting looks like this:


The setting's name is ec2ui.eiptags.MyDrifts.us-east-1 and its value is ({'75.101.15.8':'mydrifts.com'}), separated from the name by a semicolon (;). For each setting you want to transfer to the target browser, select the value (after the semicolon) from the text file and copy it to the clipboard. Then, in the target browser's about:config screen, right-click on the corresponding setting entry and choose "Modify", and paste in the new value.

All that selecting and copying and pasting is annoying, and you might make a mistake when entering the values in the target browser. I feel your pain. There must be a better way.

Copying ElasticFox Tags to Another Browser with OPIE

OPIE is a Firefox extension that allows you to import and export preference settings. The good thing about it is that it can be used to export only some settings - and we only want to export the ElasticFox settings. Unfortunately, it does not support ElasticFox!

Please help lobby the OPIE developer to add ElasticFox support by posting in this forum thread - OPIE support would make copying ElasticFox tags (and indeed, entire ElasticFox setups) between browsers much easier.

Copying ElasticFox Tags to Another Browser with Shell Scripts

I've put together two shell scripts that can be used to directly export ElasticFox settings from the Firefox prefs.js file and to directly import them back in. These scripts really export and import all your ElasticFox settings, not just tags. Read on for directions on how to use these scripts, which work on Linux, Mac OS X, and Solaris, for Firefox 3.x and above.

A word of caution before you export and import via prefs.js directly: make sure Firefox is not running when you export or import. Firefox overwrites the prefs.js file upon exiting, and reads it upon starting up. In order to make sure all your ElasticFox tags (and all other settings, too) are in the export, Firefox must be closed before exporting. Likewise, in order to make sure Firefox picks up your imported settings you need to make sure it is closed before importing.

How to Export ElasticFox Settings

Here is a handy script to export ElasticFox preferences from Firefox. You can download it, or copy it from here and save it to your local machine:
#! /bin/bash

# the base name of the extension preferences
# that are to be imported
PREF_BASE=ec2ui
# ec2ui is the extension base name of ElasticFox

# backslash-escape special characters as you
# would in a regular expression
# the following command will only escape
# periods (".") but that
should suffice
#
for firefox extensions
ESCAPED_PREF_BASE=$(echo $PREF_BASE | \
sed -e "s/\./\\\\./g")

# export desired prefs
egrep "^user_pref\(\"$ESCAPED_PREF_BASE\." prefs.js
Once you save the script locally, make it executable:

chmod +x exportFirefoxPrefs.sh

The script expects to be run in the same directory as the prefs.js file, but it's most convenient to keep this script in your home directory and create a soft-link there to the prefs.js file. On my machine, the command to make a soft-link to the prefs.js file is this:


You'll need to specify the location of your Firefox profile directory (instead of mine).

Remember to exit Firefox. Now you're ready to run the export script.

./exportFirefoxPrefs.sh > savedPrefs

This will create a file called savedPrefs containing the ElasticFox settings. Move this file to the target browser's machine, where we will import it.

How to Import ElasticFox Settings

Here is a script to import to import ElasticFox settings into Firefox. Download it, or copy it from here and save it to your local machine:
#! /bin/bash

WORKFILE=workfile.txt
OUTFILE=newPrefs.js
XFERFILE="$1"

# the base name of the extension preferences
# that are to be imported
PREF_BASE=ec2ui
# ec2ui is the extension base name of ElasticFox

if [ -z "$1" ]
then
echo "Please provide the filename\
of the file containing the prefs to import."
else
# backslash-escape any characters as you would
# in a regular expression
# this command only handles periods
# but that should suffice
for firefox extensions
ESCAPED_PREF_BASE=$(echo $PREF_BASE | \
sed -e "s/\./\\\\./g")

# backup the existing prefs
cp prefs.js prefs.js.old

# get the file header
egrep -v "^user_pref\(" prefs.js > $OUTFILE

# add all other prefs
egrep "^user_pref\(" prefs.js | egrep -v \
"^user_pref\(\"$ESCAPED_PREF_BASE\." > $WORKFILE

# add desired prefs
cat $XFERFILE >> $WORKFILE

# sort all prefs into output
sort $WORKFILE >> $OUTFILE

# clean up
rm $WORKFILE

# uncomment this when you trust this script
# to replace
your prefs automatically
#cp $OUTFILE prefs.js
#rm $OUTFILE
fi

After you save the script locally, make it executable:

chmod +x importFirefoxPrefs.sh

As with the export script above, the import script expects to be run in the same directory as the Firefox prefs.js file, so make a soft-link to the prefs.js file in the same directory as the script (see above).

Once you've made sure that Firefox is not running, you're ready to run the import script:

./importFirefoxPrefs.sh savedPrefs

This will create a file called newPrefs.js in the same directory. newPrefs.js will contain the imported ElasticFox settings from the savedPrefs file, merged with the other already-existing Firefox settings from prefs.js. The script will also create a backup copy of prefs.js called prefs.js.old. All you need to do is to replace your Firefox's prefs.js with newPrefs.js, as follows:

cp newPrefs.js prefs.js
rm newPrefs.js


Now, restart Firefox. It should contain the ElasticFox settings from the source browser. If anything doesn't work, simply exit Firefox and restore the previous prefs.js:

cp prefs.js.old prefs.js

Once you are confident that the script works consistently, you can uncomment the last few lines of the script and let it automatically replace Firefox's prefs.js file by itself - then you do not need to perform that step manually.

This method of copying ElasticFox settings using shell scripts is relatively easy, but not perfect. OPIE would be a friendlier way, and would support Windows as well (so please lobby the developer to support ElasticFox). If you're looking for your ElasticFox tags to be available via the EC2 APIs, check out my article on using security groups as a way to tag instances (but unfortunately not Elastic IPs, EBS volumes and snapshots, or AMIs).

Tuesday, July 14, 2009

Boot EC2 Instances from EBS

EBS offers the ability to have a "virtual disk drive" whose lifetime is independent of any EC2 instance. You can attach EBS drives to any running instance, and any changes made to the drive will persist even after the instance is terminated. You can also set up an EBS drive to be the root filesystem for an instance - giving you the benefits of an always-on instance but without paying for it when it's not in use - and this article shows you how to do that. I also explore how to estimate the cost savings you can achieve using this solution.

I'm not the first person to think of this idea: credit goes to AWS forum users rickdane for starting the discussion and N. Martin and Troy Volin for posts in this AWS forum thread that describe most of the heavy-lifting - this solution is largely based on their work.

Note: this article assumes you are comfortable in the linux shell and familiar with the EC2 AMI tools and EC2 API tools.

Why Boot EC2 Instances from EBS?

My company runs applications in EC2, and we test new application features in EC2 (after testing them locally) before we deploy them to our production environment. At first, each time we had a new feature to test out, we would construct a testing environment as follows:
  1. Launch a new instance of our base AMI (based on an Alestic Ubuntu Hardy Server AMI, which I highly recommend, and customized with our own basic application server stack).
  2. Make the necessary environmental changes (e.g. adding monitoring services) to the test instance.
  3. Deploy the the application (the one with new features we need to test) to the test instance.
  4. Deploy the test database from S3 to the test instance.
  5. Update the test database with any schema or data changes necessary.
  6. Test and debug the application.
  7. Save the updated test database to S3 for later use.
  8. Terminate the test instance.
This process worked great at first (even if it was a manual process). Our application is a WAR and a bunch of jar files, so they were easily uploaded to the test instance. We stored our test database in S3 as a gzipped MySQL mysqldump file, and it was easy to import into / export from MySQL. That is, until we got to the point where our test database was big enough for it to take a long time - over an hour - to reconstitute. At that point it became very annoying to bring up the test environment.

The last thing you want, as a developer, is a test environment that is difficult or annoying to set up. You want testing to be easy, quick, and inexpensive (otherwise you will start looking for shortcuts to avoid testing, which is not good for quality). Once our test environment began to require almost an hour just to set up, we realized it was no longer serving our needs. I began researching a setup that:
  • Is ready-to-go within a short time (less than five minutes)
  • Contains the most-recent environment (tools, application, and database) already
  • Only costs money when it is being used
Basically, we wanted the benefits of a server that is always-on but without paying for it when we weren't using it.

That's the "why". Read on for the "what" and the "how".

Ingredients and Tools

The solution consists of two pieces:
  • An AMI that can boot from an EBS drive (the "boot AMI")
  • An EBS drive that contains the bootable linux stack and, later, anything else you add (the "bootable EBS volume")
The main tool used to put the pieces together is the linux utility pivot_root. This program can only be run by the /sbin/init process (the startup process itself, pid 1), and it "swaps" the root filesystem out from under the OS and replaces it with a directory you specify. This will be the root directory of the EBS drive.

EBS volumes are attached to specific devices (/dev/sdb through /dev/sdp), and you'll need to choose what attach device you want the boot AMI to use. We could, theoretically, build the boot AMI to read the attach device name from the user-data provided at launch time. But this would require bringing up networking in order to download the user-data to the instance, which is complicated. Instead of doing this we will hardcode the attach device into the boot AMI. You will need to remember what device you chose in order to know where to attach the EBS drive when you launch an instance of the boot AMI. A good way to remember the chosen attach device is to name the boot AMI accordingly, for example boot-from-EBS-to-dev-sdp-32bit-20090624.

As part of choosing the attach device you'll need to know the mknod minor number associated with the device. mknod minor numbers begin at 0 (for /dev/sda) and progress in increments of 16 (so /dev/sdb is number 16, /dev/sdc is number 32, etc.) until /dev/sdp (which is number 240). mknod minor numbers are detailed in the Documentation/devices.txt file in the linux kernel source code. In the procedure below I use /dev/sdp ("p" for "pivot_root"), with mknod minor number 240.

The EC2 AMI tools are useful in preparing the bootable EBS drive: they can create an image file from an existing instance. These tools will be used to create a temporary image containing the bootable linux stack copied from the running instance, and this temporary image will then be copied to the EBS drive to make it bootable.

How to Set it Up

Here is an outline of the setup process:
  1. Set up a bootable EBS volume.
  2. Set up the boot AMI.
The detailed setup instructions follow.

Setting up a bootable EBS volume:
  1. Launch an instance of an AMI you like. I use the Alestic Ubuntu Hardy Server AMI.
  2. Create an EBS volume in the same availability zone as the instance you launched. This volume should be large enough to fit everything you plan to put on the root partition (later, not now). It can even exceed 10GB: unlike the "real" root filesystem on EC2 instances which is limited to 10GB, the bootable EBS volume is not limited to this size.
  3. Once the EBS volume is created, attach it to the instance on /dev/sdp.
  4. SSH into the instance as root and format the EBS volume:
    mkfs.ext3 /dev/sdp
  5. Mount the EBS volume to the instance's filesystem:
    mkdir /ebs && mount /dev/sdp /ebs
  6. Make an image bundle containing the root filesystem:
    mkdir /mnt/prImage
    ec2-bundle-vol -c cert -k key -u user -e /ebs \
    -r i386 -d /mnt/prImage
    These arguments are the same as you would use to bundle an AMI - please see the Developer Guide: Bundling a Unix or Linux AMI for details. The certificate and private key credentials should be copied to the instance in the /mnt partition so they don't get bundled into the image and copied to the bootable EBS volume. If you're creating a 64-bit image you'll need to substitute -r x86_64 instead.
  7. Copy the contents of the image to the EBS drive:
    mount -o loop /mnt/prImage/image /mnt/img-mnt
    rsync -a /mnt/img-mnt/ /ebs/
    umount /mnt/img-mnt
  8. Prepare the EBS volume for being the target of pivot_root. First, edit /ebs/etc/fstab, changing the entry for / (the root filesystem) from /dev/sda1 to /dev/sdp. Next,
    mkdir /ebs/old-root
    rm /ebs/root/.ssh/authorized_keys
    umount /ebs
    rmdir /ebs
  9. Detach the EBS volume from your instance.
Your bootable EBS volume is now ready. You might want to take a snapshot of it. Don't terminate the EC2 instance yet, because it will be used to create the boot AMI.

Setting up the boot AMI:
  1. Create the mount point where the bootable EBS will be mounted:
    mkdir /new-root
  2. Replace the original /sbin/init with a new one. First, rename the original:
    mv /sbin/init /sbin/init.old
    Then, copy this file into /sbin/init, as follows:
    curl -o /sbin/init -L https://sites.google.com/\
    site/shlomosfiles/clouddevelopertips/init?\
    attredirects=0
    As mentioned above, if you choose an attach device different than /dev/sdp you should edit the new /sbin/init file to assign DEVNO the corresponding mknod minor number.
    Finally, make it executable:
    chmod 755 /sbin/init
  3. Clean up the current SSH public key that was used to login to the instance:
    rm /root/.ssh/authorized_keys
    Not so fast! Once you perform this step you will no longer be able to SSH into the instance. Instead, you can move the SSH authorized_keys file out of the way, as follows:
    mv /root/.ssh/authorized_keys /mnt
  4. Bundle, upload, and register the AMI. Give the bundle a name that indicates the processor architecture and the device on which it expects the bootable EBS volume to be attached. For example, boot-from-EBS-to-dev-sdp-32bit-20090624.
  5. If you opted to move the SSH authorized_keys out of the way in Step 3, restore SSH access to the instance:
    mv /mnt/authorized_keys /root/.ssh/authorized_keys
The boot AMI is now ready to be launched. If you are feeling brave you can terminate the instance. Otherwise, you can leave it running and use it to troubleshoot problems with the launch process - but hopefully this won't be necessary.

How to Launch an Instance

Once the bootable EBS volume and boot AMI are set up, launch instances that boot from the EBS volume as follows:
  1. Launch an instance of the boot AMI.
  2. Attach the bootable EBS volume to the chosen device (/dev/sdp in the above instructions).
The boot AMI will wait until a volume is attached to the chosen device, pivot_root to the EBS volume, and then continue its boot sequence from the EBS volume.

Some troubleshooting tips:
  • To troubleshoot problems launching the instance you should look at the console output from the instance. The console output might not get updated consistently. If the console output is still empty a few minutes after launching the instance and attaching the EBS volume, try rebooting the instance, which will force the console to refresh.
  • If you need to attach the bootable EBS volume to another instance (not the boot AMI), attach it to /dev/sdp and mount it as follows:
    mkdir /ebs && mount /dev/sdp /ebs
  • The boot AMI includes a hook that allows you to add a program to be executed before it performs a pivot_root to the EBS drive. This avoids the need to re-bundle the boot AMI if you need to change the startup process. The hook looks for a file called /pre-pivot.sh on the EBS drive and executes the file if it can.
  • Booting from an EBS drive seems to take slightly longer than booting a regular EC2 instance. Don't be surprised if it takes up to five minutes until you can get an SSH connection to the instance.
  • You don't need to re-attach the EBS volume when you reboot the instance - it stays attached.
Usage Tips
  • Create a file in the root of each bootable EBS volume labeling the purpose of the volume, such as /bootable-32bit-appserver. This helps when you mount the EBS drive to an instance as a "regular" volume: the label indicates what the purpose of the volume is, and helps you distinguish it from other attached EBS drives. This is good practice even for non-bootable EBS volumes. See below for a tip on how to track the purpose of EBS volumes without looking at their contents.
  • Once you get the boot AMI running properly with the bootable EBS volume, shut it down and take a snapshot of the volume before you make any other changes to it. This snapshot is your "master bootable volume" snapshot, containing only the minimum setup necessary to boot.
  • After creating a "master bootable volume" snapshot you can (and should!) launch the boot AMI again (remembering to attach the bootable EBS volume) and customize the instance any way you want: add your application stack, your database, your tools, anything else. These changes will persist on the bootable EBS volume even after the instance has terminated. This is the main motivation for the bootable EBS volume solution!
  • You can create multiple bootable EBS volumes from the "master bootable volume" snapshot and customize them each. See below for a tip on how to keep track of the purpose of each EBS volume.
  • The setup instructions above can be used for creating either a 32-bit or a 64-bit boot AMI and matching bootable EBS volume. Because you can't run an AMI for one architecture on an EC2 instance of the other architecture, you'll need to create two separate boot AMIs and two separate bootable EBS volumes if you plan to run on both 32-bit and 64-bit EC2 instances. And, because the bootable EBS volumes created by this procedure will contain a 32-bit or 64-bit specific linux stack, be sure to attach the corresponding bootable EBS volume for the boot AMI you launch.
  • If you work with multiple EBS volumes you will want to identify the purpose of each volume without attaching it to a running instance and looking at the label file you created. Unfortunately the EC2 API does not currently offer a way to tag EBS volumes. But the ElasticFox Firefox extension does - and I highly recommend it for this purpose. Note that the volume tags will only be visible in the browser that creates them, not on other machines. [See my article on Copying ElasticFox tags between browsers for a workaround.]
Cost Implications of Booting Instances from EBS

EBS costs money beyond what you pay for the disk drives that come as part of EC2 instances. There are four components of the EBS cost to consider:
  1. Allocated storage size ($0.10 per GB per month)
  2. I/O requests ($0.10 per million I/O requests)
  3. Snapshot storage (same as S3 storage costs; depends on the region)
  4. Snapshot transfer (same as S3 transfer costs; depends on the region)
The AWS Simple Monthly Calculator can help you estimate these costs. Here are some guidelines to help you figure out what numbers to put into these fields:
  • Component #1 is easy: just plug in the size of your bootable EBS volume.
  • Component #2 should be estimated based on the I/O usage of your existing application instance. You can use iostat to estimate this number as follows:
    iostat | awk -F" " 'BEGIN {x="0.0"} \
    /^sd/ {x=x+$3} END \
    {print x}'

    The result is the number of I/O transactions per second. Multiply this figure by 2592000 (60 * 60 * 24 * 30, the number of seconds in a month) to get the number of I/O transactions per month, then divide by 1 million. Or, better yet, use this instead:
    iostat | awk -F" " 'BEGIN {x="0.0"} \
    /^sd/ {x=x+$3} END \
    {printf "%12.2f\n", x*2.592}'

    For my test environment, this figure comes to 29 (million I/O requests per month).
  • Component #3 can be estimated with the help of the guidelines at the bottom of the EBS Product Info page:
    Snapshot storage is based on the amount of space your data consumes in Amazon S3. Because data is compressed before being saved to Amazon S3, and Amazon EBS does not save empty blocks, it is likely that the size of a snapshot will be considerably less than the size of your volume. For the first snapshot of a volume, Amazon EBS will save a full copy of your data to Amazon S3. However for each incremental snapshot, only the part of your Amazon EBS volume that has been changed will be saved to Amazon S3.
    As a conservative estimate of snapshot storage size, I use the same size as the actual data on the EBS volume. I figure this covers the initial compressed snapshot plus a month's worth of delta snapshots.
  • Component #4 can also be estimated from the guidelines further down the same page:
    Volume data is broken up into chunks before being transferred to Amazon S3. While the size of the chunks could change through future optimizations, the number of PUTs required to save a particular snapshot to Amazon S3 can be estimated by dividing the size of the data that has changed since the last snapshot by 4MB. Conversely, when loading a snapshot from Amazon S3 into and Amazon EBS volume, the number of GET requests needed to fully load the volume can be estimated by dividing the full size of the snapshot by 4MB. You will also be charged for GETs and PUTs at normal Amazon S3 rates.
    My own monthly estimate includes taking one full EBS volume snapshot and creating one EBS volume from a snapshot. I keep around 20GB of data on the EBS volume. So I divide 20480 (20 GB expressed in MB) by 4 to get 5120. This is the estimated number of PUTs per month. It is also the estimated number of GETs per month.
For my usage in our test environment, the cost of running instances that boot from a 50GB EBS volume with 20GB of data on it in the US region comes to approximately $10.96 per month.

Is it financially worthwhile?

As long as your EBS cost estimate is less than the cost of running the instance for the hours it would sit unused, this solution saves you money. My test instance is an m1.large in the US region, which costs $0.40 per hour. If my instance would sit idle for at least (10.96/0.4=) 28 hours a month, I save money by using a bootable EBS volume and terminating the instance when it is unused. As it happens, my test instance is unused more than 360 hours a month, so for me it is a no-brainer: I use bootable EBS volumes.

EC2 instances that boot from an EBS volume offer the benefits of an always-on machine without the costs of paying for it when it is not in use. The implementation presented here was developed based on posts by the aforementioned forum users, and I thank them for their help.

Sunday, July 12, 2009

The "Elastic" in "Elastic Load Balancing": ELB Elasticity and How to Test it

Elastic Load Balancing is a long-anticipated AWS feature that aims to ease the deployment of highly-scalable web applications. Let's take a look at how it achieves elasticity, based on experience and based on the information available in the AWS forums (mainly this thread). The goal is to understand how to design and test ELB deployments properly.

ELB: Two Levels of Elasticity

ELB is a distributed system. An ELB virtual appliance does not have a single public IP address. Instead, when you create an ELB appliance, you are given a DNS name such as MyDomainELB-918273645.us-east-1.elb.amazonaws.com. Amazon encourages you to set up a DNS CNAME entry pointing (say) www.mydomain.com to the ELB-supplied DNS name.

Why does Amazon use a DNS name? Why not provide an IP address? Why encourage using a CNAME? Why can't we use an Elastic IP for an ELB? In order to understand these issues, let's take a look at what happens when clients interact with the ELB.

Here is the step-by-step flow of what happens when a client requests a URL served by your application:
  1. The client looks in DNS for the resolution of your web server's name, www.mydomain.com. Because you have set up your DNS to have a CNAME alias pointing www.mydomain.com to the ELB name MyDomainELB-918273645.us-east-1.elb.amazonaws.com, DNS responds with the name MyDomainELB-918273645.us-east-1.elb.amazonaws.com.
  2. The client looks in DNS for the resolution of the name MyDomainELB-918273645.us-east-1.elb.amazonaws.com. This DNS entry is controlled by Amazon since it is under the amazonaws.com domain. Amazon's DNS server returns an IP address, say 1.2.3.4.
  3. The client opens a connection with the machine at the provided IP address 1.2.3.4. The machine at this address is really an ELB virtual appliance.
  4. The ELB virtual appliance at address 1.2.3.4 passes through the communications from the client to one of the EC2 instances in the load balancing pool. At this point the client is communicating with one of your EC2 application instances.
As you can see, there are two levels of elasticity in the above protocol. The first scalable point is in Step 2, when Amazon's DNS resolves the ELB name to an actual IP address. In this step, Amazon can vary the actual IP addresses served to clients in order to distribute traffic among multiple ELB machines. The second point of scalability is in Step 4, where the ELB machine actually passes the client communications through to one of the EC2 instances in the ELB pool. By varying the size of this pool you can control the scalability of the application.

Both levels of scalability, Step 2 and Step 4, are necessary in order to load-balance very high traffic loads. The Step 4 scalability allows your application to exceed the maximum connections per second capacity of a single EC2 instance: connections are distributed among a pool of application instances, each instance handling only some of the connections. Step 2 scalability allows the application to exceed the maximum inbound network traffic capacity of a single network connection: an ELB machine's network connection can only handle a certain rate of inbound network traffic. Step 2 allows the network traffic from all clients to be distributed among a pool of ELB machines, each appliance handling only some fraction of the network traffic.

If you only had Step 4 scalability (which is what you have if you run your own software load balancer on an EC2 instance) then the maximum capacity of your application is still limited by the inbound network traffic capacity of the front-end load balancer: no matter how many back-end application serving instances you add to the pool, the front-end load balancer will still present a network bottleneck. This bottleneck is eliminated by the addition of Step 2: the ability to use more than one load balancer's inbound network connection.

[By the way, Step 2 can be replicated to a limited degree by using Round-Robin DNS to serve a pool of IP addresses, each of which is a load balancer. With such a setup you could have multiple load-balanced clusters of EC2 instances, each cluster sitting behind its own software load balancer on an EC2 instance. But Round Robin DNS has its own limitations (such as the inability to take into account the load on each load-balanced unit, and the difficulty of dynamically adjusting the pool of IP addresses to distribute), from which ELB does not suffer.]

Behind the scenes of Step 2, Amazon maps an ELB DNS name to a pool of IP addresses. Initially, this pool is small (see below for more details on the size of the ELB IP address pool). As the traffic to the application and to the ELB IP addresses in the pool increases, Amazon adds more IP addresses to the pool. Remember, these are IP addresses of ELB machines, not your application instances. This is why Amazon wants you to use a CNAME alias for the front-end of the ELB appliance: Amazon can vary the ELB IP address served in response to the DNS lookup of the ELB DNS name.

It is technically possible to implement an equivalent Step 2 scalabililty feature without relying on DNS CNAMEs to provide "delayed binding" to an ELB IP address. However, doing so requires implementing many features that DNS already provides, such as cached lookups and backup lookup servers. I expect that Amazon will implement something along these lines when it removes the limitation that ELBs must use CNAMEs - to allow, for example, an Elastic IP to be associated with an ELB. Now that would be cool.

How ELB Distributes Traffic

As explained above, ELB uses two pools: the pool of IP addresses of ELB virtual appliances (to which the ELB DNS name resolves), and the pool of your application instances (to which the ELBs pass through the client connection). How is traffic distributed among these pools?

ELB IP Address Distribution

The pool of ELB IP addresses initially contains one IP address. More precisely, this pool initially consists of one ELB machine per availability zone that your ELB is configured to serve. This can be inferred from the following pages in the ELB documentation:
  • This page, which states that the ELB will "route traffic equally amongst all the enabled Availability Zones".
  • This page, which says that ELB "evenly distributes requests across all its registered Availability Zones that contain instances. As a result, you must ensure that your LoadBalancer is appropriately scaled for each registered Availability Zone."
I posit that the above behavior is implemented by having each ELB machine serve the EC2 instances within a single availability zone. Then, multiple availability zones are supported by the ELB having in its pool at least one ELB machine per enabled availability zone.

Back to the scalability of the ELB machine pool. According to AWS folks in the forums, this pool is grown in response to increased traffic reaching the ELB IP addresses already in the pool. No precise numbers are provided, but a stream of gradually-increasing traffic over the course of a few hours should cause ELB to grow the pool of IP addresses behind the ELB DNS name. ELB grows the pool proactively in order to stay ahead of increasing traffic loads.

How does ELB decide which IP address to serve to a given client? ELB varies the chosen address "from time to time". No more specifics are given. However, see below for more information on making sure you are actually using the full pool of available ELB IP addresses when you test ELB.

Back-End Instance Connection Distribution

Each ELB machine can pass through client connections to any of the EC2 instances in the ELB pool within a single availability zone. According to user reports in other forum posts, clients from a single IP address will tend to be connected to the same back-end instance.

AWS folks say that ELB does round-robin among the least-busy back-end instances, keeping track of approximately how many connections (or requests) are active at each instance but without monitoring CPU or anything else on the instances. I'm not sure how to reconcile this with the user reports mentioned above.

How much variety is necessary in order to cause the connections to be fairly distributed among your back-end instances? AWS says that "a dozen clients per configured availability zone should more than do the trick". Additionally, in order for the full range of ELB machine IP addresses to be utilized, "make sure each [client] refreshes their DNS resolution results every few minutes."

How to Test ELB

Let's synthesize all the above into guidelines for testing ELB:
  1. Test clients should use the ELB DNS name, ideally via a CNAME alias in your domain. Make sure to perform a DNS lookup for the ELB DNS name every few minutes. If you are using Sun's Java VM you will need to change the system property sun.net.inetaddr.ttl to be different than the default value of -1, which causes DNS lookups to be cached until the JVM exits. 120 (seconds) is a good value for this property for ELB test clients. If you're using IE 7 clients, which cache DNS lookups for 30 minutes by default, see the Microsoft-provided workaround to set that cache timeout to a much lower value.
    Update 14 August 2008: If your test clients cache DNS lookups (or use a DNS provider that does this) beyond the defined TTL, traffic may be misdirected during ramp-up or ramp-down. See my article for a detailed explanation.
  2. One test client equals one public IP address. ELB machines seem to route all traffic from a single IP address to the same back-end instance, so if you run more than one test client process behind a single public IP address, ELB regards these as a single client.
  3. Use 12 test clients for every availability zone you have enabled on the ELB. These test clients do not need to be in different availability zones - they do not even need to be in EC2 (although it is quite attractive to use EC2 instances for test clients). If you have configured your ELB to balance among two availability zones then you should use 24 test clients.
  4. Each test client should gradually ramp up its load over the course of a few hours. Each client can begin at (for example) one connection per second, and increase its rate of connections-per-second every X minutes until the load reaches your desired target after a few hours.
  5. The mix of requests and connections that each test client performs should represent a real-world traffic profile for your application. Paul@AWS recommends the following:
    In general, I'd suggest that you collect historical data or estimate a traffic profile and how it progresses over a typical (or perhaps extreme, but still real-world) day for your scenario. Then, add enough headroom to the numbers to make you feel comfortable and confident that, if ELB can handle the test gracefully, it can handle your actual workload.

    The elements of your traffic profile that you may want to consider in your test strategy may include, for example:
    • connections / second
    • concurrent connections
    • requests / second
    • concurrent requests
    • mix of request sizes
    • mix of response sizes
Use the above guidelines as a starting point to setting up a testing environment that exercises you application behind an ELB. This testing environment should validate that the ELB, and your application instances, can handle the desired load.

A thorough understanding of how ELB works can go a long way to helping you make the best use of ELB in your architecture and toward properly testing your ELB deployment. I hope this article helps you design and test your ELB deployments.

Wednesday, July 8, 2009

Sending Email from EC2

A common question about moving applications to EC2 is what to do about sending email. Web applications occasionally send email, to their administrators ("Help! I'm running out of disk space!") or to their users ("Here is your forgotten password"), and this needs to work when the application is hosted within EC2 also. Unfortunately, it is not simple to send email reliably from within the cloud. Here are some tips about sending reliable email from EC2 instances.

What is the Problem?

One word: spam. Email sent from servers within EC2 is marked as spam by most ISPs and email providers. The cloud offers a very scalable way for anyone to launch email-sending machines, on-demand. Spammers know this. So do the anti-spammers. Luckily (for the anti-spammers), existing anti-spam safeguards are effective against attempts to send spam from within EC2. Unluckily (for you), these same anti-spam measures make your legitimate (I hope!) emails get flagged as spam.

The anti-spam safeguard that trips up your application's emails is called reverse DNS lookup. This lookup checks that the name and IP address of the mailserver sending the message match the name and IP address specified in DNS records. Here's how it works:
  1. A machine at mail.yahoo.com receives a message from your mail server, whose IP address is (let's say) 1.2.3.4.
  2. mail.yahoo.com looks in DNS for a PTR record for the IP address 1.2.3.4. If none exists, the mail is not delivered. Otherwise, the PTR record specifies the FQDN of the machine that should have the address 1.2.3.4. Let's say this is specified as mail.mydomain.com.
  3. mail.yahoo.com looks in DNS for the IP address of the host specified by the PTR lookup: mail.mydomain.com. If the IP address does not match the address from which the mail was received (1.2.3.4 in our case), the message is not delivered.
The above is a bit of a simplification, but it is enough to explain the difficulty in sending email from within EC2. The problem lies in step 2, when the receiving mail server tries to find the PTR record for the IP address from which the mail was sent. The public IP addresses used by EC2 belong to Amazon, and the DNS lookups for these addresses will therefore look in Amazon's DNS records. Amazon does not have PTR records pointing to your mailserver's FQDN in their DNS, so the reverse DNS lookup fails at step 2, and your email message is not delivered.

Amazon, unlike traditional hosting companies, does not have a service that allows you to set a reverse DNS entry (a PTR record) within their DNS records. If they did offer such a service it would solve the reverse DNS lookup problem, and enable your EC2 application to send emails. Of course, such a service would also allow spammers to easily use EC2 for sending spam, so it is clear that Amazon cannot offer a service to allow custom PTR records without instituting some effective safeguards against abuse.

Update 30 October 2009: Amazon now has a new email policy in which outbound SMTP traffic is blocked (beyond miniscule usage). In order to be able to send email directly from EC2 you also need to provision an Elastic IP address for your instance and submit the following form. In return, Amazon will work to keep that Elastic IP of of the common anti-spam lists. More information here. Note that the comments in this article relating to reverse DNS are still applicable: some email providers do not check the PTR records, and Amazon's new program will help email get through to those providers - but not all.

Update 25 January 2010: Amazon has announced a new private beta where they will set PTR records for your Elastic IP address. To participate in the private beta, join the EC2 developer forums and send a private message to ian@aws.

Sending Email from EC2: What Works

In any case, let us explore how you can send email from within EC2. Here are a number of cases that work:
  • One case that works is sending email to email accounts that are hosted on the same EC2 instance, using sendmail as the mail transfer agent (MTA). This can be appropriate for a corporate setting, where your recipients can be told to configure their email readers accordingly. To do this, set up sendmail on your EC2 instance, then set up a POP3 or IMAP server on the same instance, and then set up your users' email readers to fetch email from those accounts. Be sure to configure the sendmail and POP/IMAP services to accept connections only from machines you trust. (You'll probably want to use an Elastic IP and an EBS drive also, to ensure that access to those email boxes can be recovered if the instance goes down.)

    This case does not have the reverse DNS lookup problem because sendmail will deliver the messages to the account on the local machine directly, bypassing the reverse DNS lookup.

    One limitation of this approach is that the users must learn to check this "special" email account. Some email readers make this easy by allowing more than one server-side account to be checked.

    A more significant limitation to this approach is that it will not work for sending mail to recipients who have accounts elsewhere. The reverse DNS lookup anti-spam measure described above will prevent those messages from getting through.

  • Sending email from EC2 to an address whose email delivery you control can work also. The application sends email from a known email account (say, "myAppAdminEvents@mydomain.com") to your application administrators' email accounts in your domain. In this approach you set up an SMTP server on your EC2 instance. You configure the SMTP installation on EC2 to relay mail directly to your domain's mail servers. And you need to make sure that the anti-spam tools running on your domain's mail servers (and in the user's email reader) are configured to whitelist messages from the known email account.

  • You can use third-party SMTP services to send emails from your EC2 instance. There are many third-party email services available, including the free-but-limited Google Apps Email, and also including paid-but-less-limited solutions. A detailed discussion of how to set up your email to use a third-party SMTP server is beyond the scope of this article (but here's a good one). However, a useful strategy is to run an SMTP server locally on your EC2 instance which is configured to relay the mail to the third-party server. This relaying setup allows your application to benefit from reduced connection time when sending messages, and relays the messages in a separate process.

    There are many third-party SMTP service providers available, each with their own pricing structure and Terms & Conditions.

    Google Apps Email's limitations are an interesting subject, and I plan another blog article on strategies for dealing with these limitations.

The above three methods of sending email from your EC2 instances each have their pros and cons. If you're only delivering messages to internal recipients, use the first or the second method. If you are also sending mails to arbitrary addresses, go for a third-party SMTP provider.

Wednesday, July 1, 2009

EC2 Reserved Instance Billing Gotcha

So you purchased an EC2 Reserved Instance and you're looking to see the reduced hourly rate take effect immediately.

Don't.

Unlike all the other resources in EC2, which you can use immediately, reserved instances are not actually available until the credit card charge for your account is processed.

You'll need to wait until the next billing period begins the charge clears your credit card before the reserved instance is actually available and the discounted hourly rate takes effect. Until your credit card charge goes through, your instances will continue to be billed at the regular hourly rates.

It's a classic gotcha, but it's in the EC2 FAQ.

Update: According to AWS folks, the charge for the reservation is posted to your credit card soon after you order the reserved instance, instead of waiting for the next billing period. Here is the AWS Forum thread where AWS says so.